Saturday, December 31, 2011
Happy New Year!
Happy New Year to our Blog Family! May you have many Adventures in Your Kitchen this coming year!
Saturday, December 24, 2011
Leftover Ingredients Make an Awesome Breakfast
When trying what to figure out what to make for breakfast this morning, I remember that I had some ham and Swiss leftover from the Pinwheels I made last night. Then I began trying to figure out what else I had to make something with. (The inside of my fridge is pretty sad looking once you get past the Grandma's Chocolate Cake.) I then remembered that when I was watching 10 Dollar Dinners with Melissa D'Arabian last week she made this sandwich thingy with ham and Swiss.
I couldn't remember the name of the dish, but I do know she made it with tomato soup. So, I sat down at my computer and began to search on Food Network.com. I found the episode: Soup and Sandwich Savings which she made kale chips, tomato soup and the sandwich I was looking for: Quick Croque Madames.
After looking at the ingredient list, the only one to give me worry was the sour cream. I pulled 2 sour cream containers from the depths of the fridge which gave me the 1/4 cup it calls for-well, eyeballing the amount anyways. My Swiss was sliced so I poured a little white wine in a dish and took my 4 slices and kinda flipped them around and then let them hang out while I was doing the rest. I cut 4 slices of Italian bread I picked up yesterday for the Loaded Breakfast Casserole I will be preparing tonight for our breakfast on Christmas Morning. I measured the mustard and garlic by eye.
After following the directions and calling Joey to the table this is what I presented to him:

This was his plate after several bites!:

I am surprised he let me take a picture as he said it was too good for words. Michael said it would be better as a top so he could eat it as a normal sandwich. Jamey even said it was pretty good.
I might have to consult J.C. to see if she has a traditional Croque Madame Recipe. Yay!
Sunday, December 18, 2011
New Cookie: Orange Cookies
I buy random cookbooks from consignment shops, Good Will and yard sales. I also take any cookbooks that would like to be donated to me. Well, I found a 2009 copy of "A Taste of Heaven" by Chapel By the Sea located in Melbourne Beach, FL at the Growing Pains Consignment Shop in Salisbury back around Easter this year.
I while flipping through the pages last week, I found a recipe I wanted to try. It seemed pretty straight forward and extremely easy, so I hand everything on hand so I thought I'd give it a try since I was doing some baking this weekend.
The recipe was submitted by Jean Devenport / Winnie Devenport. Here is the recipe as written:
Dissolve baking soda in orange juice. Cream shortening with sugars, add eggs. Add flour, baking soda and salt, mix until smooth. Add nuts and orange juice and rind. Drop teaspoonfuls onto greased cookie sheet. Bake at 350 about 10 minutes.
I had to read it 3 times to make sure I didn't miss something. The baking soda is mentioned twice. So, I just dissolved the baking soda in the orange juice. Also, the mention of rind, I wasn't sure exactly what it meant, so I just zested the orange. I also didn't want to add the nuts, as I had used what I had for a Banana Nut Bread. I am not one for greasing a baking sheet over and over, so I used parchment paper. Instead of dropping by teaspoonfuls, I rolled the dough into balls about the size of a walnut or large jawbreaker. Once they were baked, I immediately moved them to the rack to cool. They were squishy on top when the were removed from the oven but after they started to cool, they settled and the cookie is a natural chewy cookie.
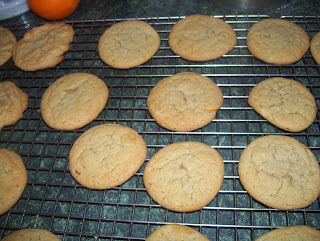 I am glad I didn't add the nuts, so now we call them Orange Cookies. I think they taste good without them. Emma said they taste like a brown sugar cookie with just a hint of orange juice. Michael just kept saying they were really good.
Now, it has me wondering if I can change it to another citrus fruit????
I while flipping through the pages last week, I found a recipe I wanted to try. It seemed pretty straight forward and extremely easy, so I hand everything on hand so I thought I'd give it a try since I was doing some baking this weekend.
The recipe was submitted by Jean Devenport / Winnie Devenport. Here is the recipe as written:
Orange Nut Cookies
3/4 cup sugar, 2 eggs, 1 cup brown sugar, 1 cup shortening, 1 tsp baking soda, 1/2 tsp salt, 3 cup flour, 1 cup chopped nuts, 1 orange (juice and rind)Dissolve baking soda in orange juice. Cream shortening with sugars, add eggs. Add flour, baking soda and salt, mix until smooth. Add nuts and orange juice and rind. Drop teaspoonfuls onto greased cookie sheet. Bake at 350 about 10 minutes.
I had to read it 3 times to make sure I didn't miss something. The baking soda is mentioned twice. So, I just dissolved the baking soda in the orange juice. Also, the mention of rind, I wasn't sure exactly what it meant, so I just zested the orange. I also didn't want to add the nuts, as I had used what I had for a Banana Nut Bread. I am not one for greasing a baking sheet over and over, so I used parchment paper. Instead of dropping by teaspoonfuls, I rolled the dough into balls about the size of a walnut or large jawbreaker. Once they were baked, I immediately moved them to the rack to cool. They were squishy on top when the were removed from the oven but after they started to cool, they settled and the cookie is a natural chewy cookie.

Now, it has me wondering if I can change it to another citrus fruit????
Tuesday, December 6, 2011
An Idea is born tonight...
So, I as I get prepared to prepare dinner, Michael says he wants to help make the Country Style Steak, Rice and Gravy. I know the help would be short-lived as my 13 yr old has an EXTREMELY short attention span, so I took it. He also said since it was his number 2 favorite dinner,(#1 being hot dogs and mac n' cheese) he would like to help. While he was scrambling the eggs and making the flour dredge we were talking about the idea that we have been throwing around for probably close to a year - doing a 7 Course Meal. I know, some idea, right?
Well, while he was working, I decided that Google would provide the answer I was asking myself :What in the world consist of a 7 Course Meal?" I found Food University which gave me what I needed to know. While I was reading what it said to him, he tells me that he wants to do Fondue again. So, I batted back to him a Picnic with a blanket and all (since we don't normally do the blanket thing). He came back with a Vegetarian Night. We went back and forth - with the aid of several of my cookbooks and made a list. We decided to name our list: "Fun with Food". It might not be the greatest or most creative title in the world, but the name is not what matters. What matters is the list as well as the family time that will incur while completing the list.
I plan to take the list and make it all neat and hang in our kitchen. Once I get it prettied up for you, I will post it.
I am sure this list will grow and I am sure we will not like all of the new recipes and I am sure it will lead us to our next great family adventure. Why, because my friends, it's all butter - and family.
Well, while he was working, I decided that Google would provide the answer I was asking myself :What in the world consist of a 7 Course Meal?" I found Food University which gave me what I needed to know. While I was reading what it said to him, he tells me that he wants to do Fondue again. So, I batted back to him a Picnic with a blanket and all (since we don't normally do the blanket thing). He came back with a Vegetarian Night. We went back and forth - with the aid of several of my cookbooks and made a list. We decided to name our list: "Fun with Food". It might not be the greatest or most creative title in the world, but the name is not what matters. What matters is the list as well as the family time that will incur while completing the list.
I plan to take the list and make it all neat and hang in our kitchen. Once I get it prettied up for you, I will post it.
Here is our list (so far):
- 7 Course Meal
- Fondue Night
- Picnic
- Tasting Menu
- Formal Dinner
- Tea Service
- Brunch
- Vegetarian Night
- Cocktail-Mocktails & Apps
- All from same publication (this one requires all items to be made from the same issue/copy of magazine or other cookbook (i.e.Taste of Home Magazine or Southern Living Annual Recipes)
I am sure this list will grow and I am sure we will not like all of the new recipes and I am sure it will lead us to our next great family adventure. Why, because my friends, it's all butter - and family.
Sunday, November 27, 2011
Adventures in Crock-potting...Chicken & Mushrooms in Wine Sauce
My family and I are on a mission to completely use up what's in our fridge and freezer in the next 20 days before we head back to NC for Christmas. A while back I had came across a recipe from a cookbook that I checked out from the library and decided to fix it tonight for dinner. I'm glad I did, because it sure was good.

I had everything on hand to make this for dinner, except mushrooms, tomato paste and thawed chicken. So, off to the store I went and came back to make a simple crock-pot dinner for my family. I still had a half bag of noodles from the Boeuf Bourguignon I made back in October and everything else is pretty much a staple pantry item. The Squished Witch wine came from the Oz Winery and made this dish superb.
Chicken & Mushrooms in Wine Sauce
3 cups sliced mushrooms (I used an 8 oz pack fresh mushrooms & 1 can of mushrooms drained)
1 large onion, sliced
2 cloves of garlic, minced
2 1/2 - 3 lbs of meaty chicken pieces (I used chicken thighs.)
3/4 cup chicken broth
1 6oz can of tomato paste
1/4 cup red wine (I used about 1/2 cup)
2 tbsp quick cooking tapioca or cornstarch
2 tsp sugar
2 Tbsp fresh basil, chopped or 1 1/2 tsp dried basil
1/4 tsp salt and pepper
2 cups of hot cooked noodles
2 Tbsp Parmesan cheese, grated
Place mushrooms, onions and garlic in the bottom of the crock-pot. Place chicken pieces on top. In a bowl, combine broth, tomato paste, wine, tapioca or cornstarch, basil, sugar, salt and pepper. Pour over chicken. Cover; cook on low for 7-8 hours or 3 1/2 - 4 hours on high.

Remove chicken from crock-pot and remove skin and bone. Serve chicken, mushrooms and wine sauce over hot noodles and sprinkle with Parmesan cheese.

Enjoy with a glass of red wine!
Sunday, November 20, 2011
Stick to Your Ribs Breakfast
This past Saturday night while talking to Michael on what he wanted for breakfast this morning before his final day playing at the Greensboro Adidas Clash, he thought biscuits and gravy were a good choice. I agreed.
While laying in bed, I began to think of the many different recipes for biscuits I have made and tried to decide which one to use. This morning, I chose to use a new recipe. I Googled "Buttermilk Biscuits". I chose the second one given to me. It had fantastic ratings and I had all the ingredients, so I gave it a try.

While laying in bed, I began to think of the many different recipes for biscuits I have made and tried to decide which one to use. This morning, I chose to use a new recipe. I Googled "Buttermilk Biscuits". I chose the second one given to me. It had fantastic ratings and I had all the ingredients, so I gave it a try.
Southern Buttermilk Biscuits. Wow, these things were great! I follow the directions as written and at the end when I pulled them out, I rubbed some butter over the hot biscuits. These are a definite do again and again! Maybe next time, I will make them in a square pan!

Saturday, November 19, 2011
Cooking Ahead for Thanksgiving!
A few years ago, I stumbled upon a recipe in my Kraft Food & Family magazine and this recipe for Stuffing Balls has become a family favorite around the holidays. The best part is you can make them up to a month in advance.
Stuffing balls, a mixture of all your favorite side dishes on Thanksgiving.

1 lb. ground pork
1 pkg. (6 oz.) STOVE TOP Stuffing Mix for Chicken
3/4 cup cranberry sauce
1 egg
1 cup water
2 Tbsp. butter, melted
make it
HEAT oven to 325ºF.
COOK meat in large skillet until cooked through, stirring frequently; drain. Place in large bowl; cool slightly. Stir in stuffing mix.
ADD cranberry sauce, egg and water; mix well. Shape into 16 balls; place on foil-covered baking sheet. Brush with butter.
BAKE 20 min. or until done (160ºF).
kraft kitchens tips
SIZE-WISE
Enjoy your favorite foods while keeping portion size in mind.
MAKE AHEAD
Prepare and shape stuffing balls as directed. Freeze in airtight container up to 1 month. Thaw in refrigerator, then bake as directed.
Variations- Saute one medium onion and celery in a bit of olive oil or butter and then add to the pork and stove top mixture, before adding the egg, whole berry cranberry sauce and chicken broth in lieu of water. This recipe double easily and makes about 40 balls if adding onions and celery to the mix.

Here they are in the freezer. I flash freeze mine for a few hours and then put them in a zip top bag or freezer safe container a few days before I need them. Then I thaw, brush with butter and bake as directed on Thanksgiving day. It can't get much easier than preparing this side dish ahead of time. Enjoy!
Friday, November 18, 2011
Split Pea Soup and a trip to the California Wine Country!

Recently I watched a show on the Travel Channel, which documented some of America's "All You Can Eat Paradise". The show traveled to Buellton, California to a roadside restaurant serving up bottom-less bowls of Split Pea Soup. Now, I have never tried split pea soup, I took a gamble and bought a bag of dried split peas from the store the other day. After googling for a few minutes, I came across their classic vegan recipe on another food blog-Worth the Whisk and had everything on hand to make this soup for lunch today. The only thing I did differently to this recipe was saute the onions, celery and carrots in a small amount of vegetable oil.

Even as I am enjoying my second bowl, I know that mine is nowhere near the taste of Andersen's classic recipe. But, it sure is good! I'm adding a trip to the California wine country along with a visit to Pea Soup Andersen's to my bucket list.

Original Recipe for 8 bowls of Andersen’s Famous Split Pea Soup~original post from Worth the Whisk
- 2 quarts of soft water
- 2 cups of Andersen’s Specially Selected Green Split Peas
- 1 branch of celery, coarsely chopped
- 1 large carrot, chopped
- 1 small onion, chopped
- 1/4 teaspoon of ground thyme
- 1 pinch of cayenne
- 1 bay leaf
- Salt & pepper
Boil hard for 20 minutes, then slowly until peas are tender. Strain through fine sieve and reheat to boiling point.
Top with bacon pieces, shredded cheese and croutons or as is and enjoy.
Cooking with Dad
Wednesday, my Dad suggested that we have dinner together. Well, that is something that my arm DOES NOT have to be twisted to do. I love cooking (and eating) with my Dad. He came over this morning to decide on a menu then do a grocery run.
We decided on Spaghetti with Meat Sauce, Garlic Bread, and a Salad. I added that I thought we needed a dessert to go with our dinner and wanted to do something that went along with the menu. Searching through my "To Try" Recipe Notebook proved to provide a recipe that is a most definite do again dessert.
 Dad made his family famous "No Recipe Available" Meat Sauce. I have watched him many times but mine never taste like his. Joey informed me that he was sorry but Papa's Spaghetti Sauce was a million times better than mine but mine was still good. Which, I am definitely okay with. That is one of those things that are special when families cook together. The fresh Parmesan Cheese I grated was awesome with the meat sauce. I made some Whipped Butter for our Garlic Bread and some Blue Cheese Dressing for our Salads. The recipe I used for my Blue Cheese Dressing has its roots in the dressing from the Chicago Steakhouse Sandwich, I just use less mayo, add sour cream and less buttermilk and more blue cheese. It ends up being a tasting game as it is made and gets better the longer it hangs out in the fridge. I felt very proud and my heart grew warm when my Dad said that my dressing was better than what comes from the jar.The salad itself was super basic, just some Red Leaf Lettuce, Arugula, Red Onion, Carrot and Cherry Tomatoes.


 The recipe turned out to be extremely easy. The citrus flavor grabs you as you bite and it is extremely pleasing to the pallet. Please remember, if you choose to bake this most excellent recipe, that the biscotti will be hard. As it is suppose to be. That is why you dunk it in your coffee or tea!
I used regular ground yellow cornmeal, as once again, I couldn't find the correct product here in no-where North Carolina. However, I do have to say that I enjoyed the texture of the biscotti with the yellow cornmeal that was available, which was House Autry. House Autry makes fabulous products that I use for shrimp, hush puppies, cornbread and onion rings. Next time you are at the store, pick some up instead of the store brand or your other normal choice. Plus the company is here in North Carolina!
If you haven't done so already, please join us on Facebook to see things that might not make it on the blog or the ideas that spark and become more that make it to the blog!

We decided on Spaghetti with Meat Sauce, Garlic Bread, and a Salad. I added that I thought we needed a dessert to go with our dinner and wanted to do something that went along with the menu. Searching through my "To Try" Recipe Notebook proved to provide a recipe that is a most definite do again dessert.


I did not go out and buy the arugula for this salad,I had it on hand. Several days ago, I made some more of the Boursin Cheese and wanted to try it with roast beef as the note from the original recipe said it would be good with. Julie and I discussed the options of a leafy green to put with the sandwich. Arugula was chosen because of the peppery flavor it has. We thought it would go good with the baguette and thinly sliced roast beef I got from the deli. I also grabbed a ripe tomato and a red onion that would be thinly sliced. During our discussion, we thought that the thinly sliced onion and tomato would be the best option as not to over power any other ingredient. I built the sandwiches by cutting the bread into 6 inch segments then slicing them open. I then smeared Boursin Cheese on both sides and laid down some of the red onion on the bottom so they would "stick" to the cheese and not fall out. Then I added a generous portion of the roast beef followed by the arugula and tomato then closed up the sandwich. Unfortunately, my camera batteries had been stolen so that they could power the Xbox 360 controller, therefore I can't share a picture at this time. Michael did say that the sandwich "tasted of perfection and nothing needed to be changed", Emma's opinion that the sandwich was "re-donk-u-lous" and Joey just kept saying "Yum, oh my gosh this is great."
Chocolate Citrus Biscotti by Giada De Laurentiis was the recipe that I tested last night. A cup of coffee was chosen to accompany the biscotti as dessert. I have had this recipe printed since December 2004, so I thought yesterday was a good time to give it a try.

 The recipe turned out to be extremely easy. The citrus flavor grabs you as you bite and it is extremely pleasing to the pallet. Please remember, if you choose to bake this most excellent recipe, that the biscotti will be hard. As it is suppose to be. That is why you dunk it in your coffee or tea!
 If you haven't done so already, please join us on Facebook to see things that might not make it on the blog or the ideas that spark and become more that make it to the blog!

Saturday, November 12, 2011
What exactly is a Croquette?
Night before last, I decided I wanted to make something new to go with the steaks we were having for dinner. Flipping to a list of recipes that I keep with my Southern Living Annual Recipes Cookbooks, I decided on Potato Croquettes. This recipe appears in the June section on page 116 of the 1987 Annual. First off, I had to figure out what a croquette was. Once that was settled, I began to peel the potatoes and realized that the potato cakes that I make are kinda like a croquette. I love being enlightened on food. :) The only thing this recipe doesn't mention is that leftover mashed potatoes would work better OR if you make them for this recipe, that you don't need to add milk or whatever you normally use to make them really creamy. A little creamy would be okay, but not super creamy. Mine were flat, like a formed hashbrown patty, but next time, I'll see if I can make them more tubular.
 In an earlier post I made some Chocolate Syrup to go with the Chocolate Pancakes. The syrup has been living in the fridge since then and been used on random food or just in a spoon. (Yes, I know the picture is sideways - it isn't in my files. Since my laptop got dropped and the screen busted, I work in "safemode", it won't run some programs and I keep forgetting to email the pic out to get it fixed and hope it shows up right. *sigh*) I made Michael some scrambled eggs and warmed a Potato Croquette for his breakfast. (I'll have to take a picture next time I make these because Joey and Emma took the camera for a day trip with their Papa today.) I grabbed the milk and was like "Hum...." and grabbed the bottle of Chocolate Syrup. I mixed up a glass for Michael with the promise that if it wasn't good, he could pour it out and drink regular milk. The color is lighter than when using Hershey's Chocolate Syrup or Nesquik, but the flavor was there! Michael said it taste just like the stuff we buy. That is enough for me, that I will make them their chocolate syrup from now on.
 In an earlier post I made some Chocolate Syrup to go with the Chocolate Pancakes. The syrup has been living in the fridge since then and been used on random food or just in a spoon. (Yes, I know the picture is sideways - it isn't in my files. Since my laptop got dropped and the screen busted, I work in "safemode", it won't run some programs and I keep forgetting to email the pic out to get it fixed and hope it shows up right. *sigh*) I made Michael some scrambled eggs and warmed a Potato Croquette for his breakfast. (I'll have to take a picture next time I make these because Joey and Emma took the camera for a day trip with their Papa today.) I grabbed the milk and was like "Hum...." and grabbed the bottle of Chocolate Syrup. I mixed up a glass for Michael with the promise that if it wasn't good, he could pour it out and drink regular milk. The color is lighter than when using Hershey's Chocolate Syrup or Nesquik, but the flavor was there! Michael said it taste just like the stuff we buy. That is enough for me, that I will make them their chocolate syrup from now on.
Thursday, November 10, 2011
Pasty Flour?????
My friend asked if I would make a Carrot Cake for her husband's birthday, so I said I would. Even though I had never made one - but my lovely little sister had. So, I emailed her for the recipe she used. She sent the email and as I read it I notice it called for pastry flour.
I called her up and she said that she stumbled upon whole wheat pastry flour at a local grocery store in no-where Kansas. I had no such luck here in no-where North Carolina. With not finding any, I went to Google for help. I found others had the same question. I found my answer here at ehow. It's a pretty simple recipe.
3/4 cup all purpose flour + 1/4 cup cake flour
= 1 cup pastry flour
In my readings, I also learned the differences between all-purpose flour, bread flour, cake flour and pastry flour. It all has to do with the amount of protein in the flour. The Kitchn explains it much better than I will for you. Plus, why would I re-write something that someone else has already written???
 So, my carrot cake is now in the oven baking away. Check out our Facebook Page later on to see a pic of the finished cake and be sure to "Like Us" too!
Monday, November 7, 2011
The Road to Real Food....
Anyone else caught wind of this "real food" movement? As an avid blogger who gathers recipes, cooking information and getting the low-down on the newest diet craze, I've recently discovered the "real food movement" sweeping the nation. This movement is making people, just like you and me, toss processed foods and going for meals made from fresh fruits, vegetables, local meat, dairy and bread. It's also referred to as "slow", "green" or "local", where people are enjoying things in season and organic, if possible.
So what's this got to do with our blog? Pretty much everything. Since we first started Adventures in Our Kitchens, we originally were doing a combo of Julia Child and Paula Deen recipes. The one main thing these two ladies had in common is their love of butter. Not margarine, but BUTTER. Anyone else ever read that email telling people the difference between butter and margarine? Not all of it is entirely true, but margarine is about as processed as you can get in the culinary world.
Aside from all of this, what lead me on this quest was just looking for ways to shrink our food budget. My husband & I will be graduating from Dave Ramsey's Financial Peace University -Military Edition on Saturday. We've learned so much in the last 12 weeks of class, but are still looking for ways to cut costs and stay healthy. I reverted back to some old things I did when we started our youngest on a GF/CF diet almost a year and a half ago. We went back to eating potatoes or rice, veggies and a protein for dinner. Super simple and wholesome. I admittedly tried the same thing back in March of this year with starting Meatless Mondays and shopping the perimeter of the grocery store, but lapsed back into bad habits and food cravings.
What's that old saying? If you don't succeed at first, try again. Well, I'm trying again.
We enjoyed another Meatless Monday last night with the return of my legendary black bean burgers*. There are very few ingredients in this recipe and it comes together in minutes. The longest thing to cook were the fries served with dinner. The jalapeno cheese adds a bit of zing to the burgers too. As an added bonus we had a local homegrown tomato to slice and pile on our burgers. * Check the 03/14/2011 post for the recipe.

These burgers fool even the pickiest of eaters while looking like real burgers.

Last week, I had a request from a friend to make a first birthday cake for her daughter, who is obsessed with ice cream sandwiches. I guess they ease the pain from teething. So, I made a test run cake and came up with a Strawberry & Vanilla Ice Cream Cake. I made it with a box of Strawberry cake mix, the only changes were that I subbed the oil for a 4 oz container of strawberry flavored applesauce and baked as directed. Then I used Breyer's All Natural Vanilla Ice Cream for the layers. Bake the cake in a 11x14 sheet pan, cool and then cut the cake to fit the inside of a spring-form pan and freeze for 30 minutes. Layer ice cream that has sat in the fridge for a few hours and freeze for 30 minutes. Repeat with cut pieces of cake, freeze and layer ice cream again and end with cake on the bottom. Wrap in plastic and freeze for several hours. Remove from freezer 5-10 minutes before serving, then cut and enjoy.

Now, we're by no means 100% free of processed foods, but we're off to a good start. If you moved our potato basket on the bottom shelf of the pantry, you'd see our love of Duke's Mayonnaise. We have juice, cereals and assorted odds and ends, but we're getting rid of it slowly. I'm still incorporating these processed goods into our current meals. I don't believe in wasting money, so we'll have another Spongebob taco night courtesy of Ortega and Friday night pizza a few more times. More importantly, our pantry is in a better state than a month or two ago. Yes, we still have fruit snacks and animal crackers for our boys, but fresh fruit or a few carrots have always been an option. This topic on real food has peaked my interest and I've picked up a few books from the local library. Soon I will be sharing my thoughts on what the authors suggest for a real food lifestyle. So, join me on a slow movement towards real food.
Sunday, November 6, 2011
Rum and Paula make it a Hit!
 Last night our family got together to celebrate Julie's "29th" Birthday. She requested Chicken and Dumplings which our Mom made. I told her that I would surprise her with her cake. For my birthday, she gave me a bottle of Rum Flavoring. Taking this as a hint, I began looking for Rum Cake Recipes. I found this Golden Rum Cake recipe at All Recipes. As normal, I read through some of the comments and made the following changes: I used a cake mix with pudding in the mix, I did not use the walnuts and I used Bacardi's Gold (basically because I couldn't afford the Myer's Dark Rum yesterday)and I poked holes all over the cake before using the glaze. The cake turned out beautifully. It is very rich and it is amazing that you can't even tell it started out from a box.


Saturday, November 5, 2011
I found it!!!
I told you I would find it! I did! I did!
In my last post I couldn't give credit to the fantastic lady who submitted her recipe to Southern Living and had it printed for the Choco Chip Squares.So here's to you, Mrs. Ruth Tauzin of Opelousas, LA for having your AWESOME recipe in the 1989 Southern Living Annual (June, page 142)!!!!

Sunday, October 23, 2011
My Hubby's Birthday
Today is Jamey's birthday. So that means his favorite French Beef Salad and Chocolate Chip Squares for dessert. The Chocolate Chip Squares that he enjoys so much I found well over 13 years ago from a Southern Living Annual, but I can't find the original copy of the recipe, so I can't give proper credit for the recipe and the wonderful lady who submitted it at this moment, but when I find it I will! I promise!

Lunch today, I made French Onion Soup using the broth that was made from the beef roast that I cooked in the Crock-Pot last night while we slept. I love my Crock-Pot! Now, the said meat is chilling in the fridge awaiting on me to dress it with it's vinaigrette, Swiss, Red Onions and Green Peppers. Since Joey don't care for FBS, I picked up some thin steaks I will grill for him before we eat. The kids have also requested Yorkshire Pudding, which I will be ever so grateful to fulfill for them. Jamey will be happy with just the FBS and a glass of Sweet Tea.

Lunch today, I made French Onion Soup using the broth that was made from the beef roast that I cooked in the Crock-Pot last night while we slept. I love my Crock-Pot! Now, the said meat is chilling in the fridge awaiting on me to dress it with it's vinaigrette, Swiss, Red Onions and Green Peppers. Since Joey don't care for FBS, I picked up some thin steaks I will grill for him before we eat. The kids have also requested Yorkshire Pudding, which I will be ever so grateful to fulfill for them. Jamey will be happy with just the FBS and a glass of Sweet Tea.
Friday, October 21, 2011
Top Secret Recipes….Revealed!
Earlier this morning I posted a picture of a birthday cake I made for a friend stationed here with her husband & family at
This recipe is no secret for Cheerwine loving fans. The recipe has been posted before on their website along with their Holiday Punch, BBQ sauce and ice cream recipes, but they’ve disappeared. Have no fear, this Cheerwine addict has them all.

For the basic Cheerwine cake recipe, you'll need....
CheerDevil Cake
1 box Devil’s Food Cake Mix
1 teaspoon almond extract
Cheerwine Icing
1/3 cup Cheerwine*
2 ½ cups powdered sugar
½ cup margarine
¼ teaspoon almond extract
¼ cup cocoa powder
1 cup chopped walnuts (optional)
Heat Cheerwine, margarine and cocoa together over medium heat until the mixture comes to a boil. Remove from heat and add powdered sugar and blend until smooth. Stir in almond extract and mix in chopped nuts. Cool slightly and spread over cake. *Diet Cheerwine can be substituted for the cake and icing in either recipe.

Here’s my little Ayden on his second birthday enjoying a classic Cheerwine cake my husband made for him.
Now for the enhanced version of Cheerwine Cake and new creamy icing, I made a few substitutions. Starting with the cake mix, I replaced the vegetable oil with the same amount of all natural applesauce and proceeded with the basic Cheerwine cake recipe. This makes you feel a bit less guilty while enjoying all this chocolaty goodness infused with Cheerwine. Then grease and flour two 9 inch cake pans and bake as directed. Let the cakes cool completely and then frost with the icing.

I went in a completely different direction with the new icing. The regular icing is very runny and sets up after an hour or so. I opted for a semi-homemade Grandma Strick inspired chocolate icing that would be creamy and ice two 9 inch cakes.
1 container creamy home-style milk chocolate icing
½ teaspoon almond extract*
¼ cup of Cheerwine*
4 tablespoons of powdered sugar*
Starting with a container of creamy home-style milk chocolate icing from the store, place in bowl of stand mixer or use a hand mixer. Add the almond extract and Cheerwine. Mix well and add powdered sugar to thicken it back up. Frost cake and place it in fridge for an hour to set up completely before serving.
*These amounts are estimation, add to taste and desired consistency of icing.

If you can’t find Cheerwine near you, try the Cheerwine locator online. The basic recipe uses almost an entire 8 oz can for the cake mix and icing. Enjoy!
Thursday, October 20, 2011
Anniversary Dinner
Last Wednesday, my husband & I celebrated our 9th wedding anniversary.

For the first time in 2 years (thanks to the U.S. Army) our traditions continued together. Monday night we watched How I Met Your Mother & WWE Monday Night Raw, we watched Billy Madison on Tuesday evening, which was our first date movie & enjoyed dinner together on Wednesday. We can almost turn it into a week long celebration. The only thing that was missing was the Blue Bell Wedding Cake Ice Cream. We had decided early on that we would be going out for dinner due to it being a school night and saving all we can for our trip home at Christmas. But, we had a nice candlelight dinner with two of the world’s cutest boys.
For dinner, I prepared Beef Wellington with mushroom duxelles for MtAoFC Vol. 1 by Julia Child (see I told you that you needed to buy that cookbook) and modified it slightly by using store-bought puff pastry sheets.

Alongside the Beef Wellington, I served braised Brussels sprouts with lemon-pepper and parmesan cheese. Super simple recipe, just steam frozen sprouts for 5 minutes in the microwave, cut in half, and toss with EVOO and lemon-pepper seasoning. Then place in a baking dish cut side up, sprinkle with grated parmesan cheese and bake along side the Beef Wellington and then broil for 5 minutes to brown the cheese. After dinner we snuggled up on the couch and watched Survivor, cheered on Cochran and enjoyed a sweet Pumpkin Whoopie Pie!

The whoopie pies were a first attempt for me and they turned out great! Thanks to the lovely ladies once again at Our Best Bites for the recipe. I hope you all enjoy these tasty recipes!
Friday, October 7, 2011
Further Proof I need a Le Creuset Dutch Oven!
Today, since I couldn't be in North Carolina to celebrate my oldest sister Mande's birthday, I decided to honor her in a different way. I'm not talking about sending her a card or posting a "Happy Birthday!" on her Facebook wall (which I did), but I did make a dinner in her honor. Earlier last week, while grocery shopping I bought all the ingredients for a recipe that I had never made before:
Earlier last week, while grocery shopping I bought all the ingredients for a recipe that I had never made before:Julia Child's Boeuf Bourguignon
Yep, JC's timeless Beef Burgundy. One of Mande's favorite dishes that she likes to make is her own version of Rachael Ray's Beef Burgundy. She has since then been inspired to one day make Julia's version, but I beat her to it. (Sorry Sis!)
Let me say that the aroma that has filled the house all day while this has been cooking is amazing. It's a deep, earthy smell of root veggies, wine, thyme and bay leaves.
Almost as enticing as Christmas Scent, which is a slow simmered pot of cinnamon sticks, cloves, bay leaves and citrus. Mmmm...heaven. Cloves have that homey smell and reminds me of my Grandma Strick's kitchen. Ah, memories.
I didn't have the bacon rind as called for and used Merlot. I was limited in my choice of wines this time, but next time I will be swinging by the Oz Winery in Wamego, Kansas for a bottle of "Ding Dong the Wine is Red" next time I prepare this wonderful dish.
This dish is simple enough, ingredient-wise, but is labor intensive. I used too many pots and pans. I had a hard time making the Beef Burgundy in my small 2 1/2 quart stoneware casserole dish that I got a Pier One long ago, which is further proof I want a Le Creuset Dutch Oven! A cast iron casserole dish or dutch oven would have saved me from washing several pots & pans, since I couldn't put my stoneware directly on the stovetop. Then again, a $200 price tag on a 3 1/2 qt. cast iron dutch oven makes me a bit sick and doing a few extra dishes isn't so bad. But, I would love to have an Ikea Senior 3 quart Casserole for $39.99 (as pictured above) in the same color blue as the fancy overpriced one.
I browned the bacon and beef in my small cast iron frying pan, transferred it to my smallish stoneware casserole dish for part of the cooking process, transferred into my large pasta pot to simmer the wine and broth in, then bravely poured the contents back into my stoneware casserole dish & prayed it didn't overflow on the counter. It didn't, but I'll be the first to tell you this fills up an entire 2 1/2 quart dish. I set it back in the lower 3rd of my oven as instructed by Child and put a baking sheet underneath the dish to eliminate my worries of a bubbling mess on the bottom of my oven. Fears aside I went ahead and sautéed my Baby Bella mushrooms in butter and did the same with my frozen pearl onions in lieu of brown-braising them in stock. The Boeuf Bourguignon cooked for 2 hours and 45 minutes and finished up around 12:30. I took it out of the oven and let it cool....
 ......had a bowl for lunch......
and then put it into the refrigerator. When we were ready for dinner I set it back in the oven to warm up while I got the egg noodles ready. It took a good 20 minutes to heat through after a quick 5 minutes in the microwave. I served it over buttered egg noodles and alongside a salad with French dressing and a crusty loaf of French bread.
Delicious ~ is all I can say.
 There's a bit of disappointment I have to share and it's that I'm not posting the full recipe on our blog. This is one cookbook that I believe that everyone sho
 uld have or borrow and read through. Here's a real treat, Barnes & Noble just released the Nook e-book version of Mastering the Art of French Cooking Vol. 1 for $19.99, so there's no excuse why you don't have a copy. If you're real desperate here's a link to the recipe on food.com. I have learned so much from reading through the different recipes in Volumes 1 & 2, My Life in France and reading one of my favorite books, Julie & Julia which I read back in 2009. I even did a review of Powell's book on my personal blog. I hope that this post has given some of you a bit of inspiration to attempt this timeless dish.
 Bon appétit!
Subscribe to:
Posts (Atom)